======================================================================
A Simple Web Server
======================================================================
JAVA (Web Server)架設
程式碼:
///A Simple Web Server (WebServer.java)
import java.io.BufferedReader;
import java.io.InputStreamReader;
import java.io.PrintWriter;
import java.net.ServerSocket;
import java.net.Socket;
/**
* Example program from Chapter 1 Programming Spiders, Bots and Aggregators in
* Java Copyright 2001 by Jeff Heaton
*
* WebServer is a very simple web-server. Any request is responded with a very
* simple web-page.
*
* @author Jeff Heaton
* @version 1.0
*/
/*
* Examining the Mini Web Server
*
* Server sockets use the ServerSocket object rather than the Socket object that
* client sockets use. There are several constructors available with the
* ServerSocket object. The simplest constructor accepts only the port number on
* which the program should be listening. Listening refers to the mode that a
* server is in while it waits for clients to connect. The following lines of
* code are used in Listing 1.3 to create a new ServerSocket object and reserve
* port 80 as the port number on which the web server should listen for
* connections:
*
* try {
* // create the main server
* socket s = new ServerSocket(80);
* }
* catch(Exception e) {
* System.out.println("Error: " + e );
* return;
* }
*
* The try block is necessary because any number of errors could occur when the
* program attempts to register port 80. The most common error that would result
* is that there is already a server listening to port 80 on this machine.
* Warning
*
* This program will not work on a machine that already has a web server, or
* some other program, listening on port 80.
*
* Once the program has port 80 registered, it can begin listening for
* connections. The following line of code is used to wait for a connection:
*
* Socket remote = s.accept();
*
* The Socket object that is returned by accept is exactly the same class that
* is used for client sockets. Once the connection is established, the
* difference between client and server sockets fade. The primary difference
* between client and server sockets is the way in which they connect. A client
* sever connects to something. A server socket waits for something to connect
* to it.
*
* The accept method is a blocking call, which means the current thread will
* wait for a connection. This can present problems for your program if there
* are other tasks it would like to accomplish while it is waiting for
* connections. Because of this, it is very common to see the accept method call
* placed in a worker thread. This allows the main thread to carry on other
* tasks, while the worker thread waits for connections to arrive.
*
* Once a connection is made, the accept method will return a socket object for
* the new socket. After this point, reading and writing is the same between
* client and server sockets. Many client server programs would create a new
* thread to handle this new connection.
*
* Now that a connection has been made, a new thread could be created to handle
* it. This new worker thread would process all the requests from this client in
* the background, which allows the ServerSocket object to wait for and service
* more connections. However, the example program in Listing 1.3 does not
* require such programming. As soon as the socket is accepted, input and output
* objects are created; this same process was used with the SMTP client. The
* following lines from Listing 1.3 show the process of preparing the newly
* accepted socket for input and output:
*
* //remote is now the connected socket
* System.out.println("Connection, sending data.");
* BufferedReader in
* = new BufferedReader( new InputStreamReader(remote.getInputStream()) );
* PrintWriter out = new PrintWriter(remote.getOutputStream());
*
* Now that the program has input and output objects, it can process the HTTP
* request. It first reads the HTTP request lines. A full-featured server would
* parse each line and determine the exact nature of this request, however, our
* ultra-simple web server just reads in the request lines and ignores them, as
* shown here:
*
* //read the data sent. We basically ignore it,
* //stop reading once a blank line is hit. This
* //blank line signals the end of the
* //client HTTP headers.
* String str=".";
* while(!str.equals(""))
* str = in.readLine();
*
* These lines cause the server to read in lines of text from the newly
* connected socket. Once a blank line (which indicates the end of the HTTP
* header) is reached, the loop stops, and the server stops reading. Now that
* the HTTP header has been retrieved, the server sends an HTTP response. The
* following lines of code accomplish this:
*
* //Send the response
* //Send the headers out.println("HTTP/1.0 200 OK");
* out.println("Content-Type: text/html");
* out.println("Server: Bot");
* //this blank line signals the end of the headers out.println("");
* // Send the HTML page out.println( " <H1> Welcome to the Ultra Mini-WebServer </H2> ");
*
* Status code 200, as shown on line 3 of the preceding code, is used to show
* that the page was properly transferred, and that the required HTTP headers
* were sent. (Refer to Chapter 2 for more information about HTTP headers.)
* Following the HTTP headers, the actual HTML page is transferred. Once the
* page is transferred, the following lines of code from Listing 1.3 are
* executed to clean up:
*
* out.flush(); remote.close();
*
* The flush method is necessary to ensure that all data is transferred, and the
* close method is necessary to close the socket. Although Java will discard the
* Socket object, it will not generally close the socket on most platforms.
* Because of this, you must close the socket or else you might eventually get
* an error indicating that there are no more file handles. This becomes very
* important for a program that opens up many connections, including one to a
* spider.
*/
public class WebServer {
/**
* WebServer constructor.
*/
protected void start() {
ServerSocket s;
System.out.println("Webserver starting up on port 80");
System.out.println("(press ctrl-c to exit)");
try {
// create the main server socket
s = new ServerSocket(80);
} catch (Exception e) {
System.out.println("Error: " + e);
return;
}
System.out.println("Waiting for connection");
for (;;) {
try {
// wait for a connection
Socket remote = s.accept();
// remote is now the connected socket
System.out.println("Connection, sending data.");
BufferedReader in = new BufferedReader(new InputStreamReader(
remote.getInputStream()));
PrintWriter out = new PrintWriter(remote.getOutputStream());
// read the data sent. We basically ignore it,
// stop reading once a blank line is hit. This
// blank line signals the end of the client HTTP
// headers.
String str = ".";
while (!str.equals(""))
str = in.readLine();
// Send the response
// Send the headers
out.println("HTTP/1.0 200 OK");
out.println("Content-Type: text/html");
out.println("Server: Bot");
// this blank line signals the end of the headers
out.println("");
// Send the HTML page
out.println("<H1>Welcome to the Ultra Mini-WebServer</H2>");
out.flush();
remote.close();
} catch (Exception e) {
System.out.println("Error: " + e);
}
}
}
/**
* Start the application.
*
* @param args
* Command line parameters are not used.
*/
public static void main(String args[]) {
WebServer ws = new WebServer();
ws.start();
}
}
=======================================================================
在程式中的out.println("<H1>Welcome to the Ultra Mini-WebServer</H2>");
做修改成
out.println("<H1>9930081</H2>");
out.println("<H1>賴鈺翰</H2>");
來顯示自己的網頁!!

================================================================
Windows 環境Apache Http Server 2.2.25 安裝教學
========================================================================安裝完成後,開啟Apache

在"C:\Program Files\Apache Group\Apache2\conf\"底下找到http.conf
在http.conf裡可以更改Web的首頁路徑-
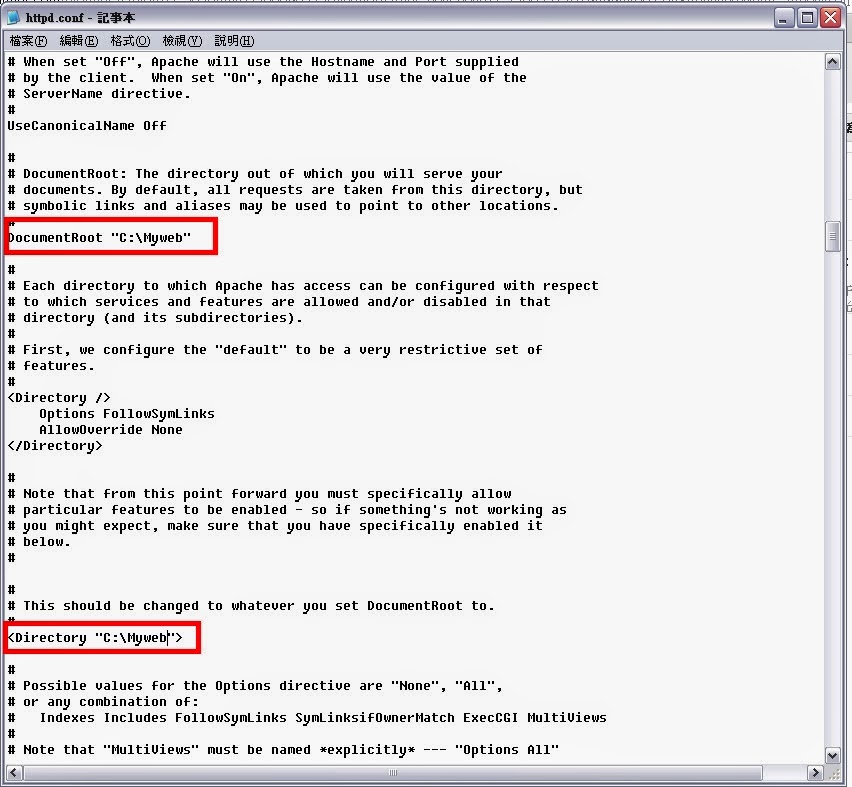
更改完成後-
此處用"鳥哥的 Linux 私房菜"來做首頁範例

============================================================================
JAVA Server 剪刀石頭布
程式碼
================================================================
//Server
import java.io.*;
import java.net.*;
import java.util.*;
import java.awt.*;
import java.awt.event.*;
import javax.swing.*;
public class Server extends JFrame {
private JTextArea JtaR = new JTextArea();
public static void main(String[] args) {
new Server();
}
public Server() {
getContentPane().setLayout(new BorderLayout());
getContentPane().add(new JScrollPane(JtaR), BorderLayout.CENTER);
setSize(450, 300);
setTitle("Server");
setDefaultCloseOperation(JFrame.EXIT_ON_CLOSE);
setVisible(true);
try {
ServerSocket Sersock= new ServerSocket(7000);
JtaR.append("Server started at " + new Date() + '\n');
Socket ConTe = Sersock.accept();
DataInputStream disFC = new DataInputStream(
ConTe.getInputStream());
DataOutputStream dosTC = new DataOutputStream(
ConTe.getOutputStream());
while (true) {
double Numb = disFC.readDouble();
double Aex = Math.floor(3.0*Math.random())+1;
//dosTC.writeDouble(Aex);
JtaR.append("Number received from client: " + Numb + '\n');
JtaR.append("Random number is : " + Aex + '\n');
if(Numb == 1.0 && Aex == 1.0 || Numb == 2.0 && Aex == 2.0 || Numb == 2.0 && Aex == 2.0)
{JtaR.append("PIECE!!" + '\n');
dosTC.writeDouble(6.0);
}
else if(Numb == 1.0 && Aex == 2.0 || Numb == 2.0 && Aex == 3.0 || Numb == 3.0 && Aex == 1.0)
{JtaR.append("Computer WIN!!" + '\n');
dosTC.writeDouble(5.0);
}
else if(Numb == 1.0 && Aex == 3.0 || Numb == 2.0 && Aex == 1.0 || Numb == 3.0 && Aex == 2.0)
{JtaR.append("User WIN!!" + '\n');
dosTC.writeDouble(4.0);
}
JtaR.append("PIECE!!" + '\n'); //傳送資料到Client
}
}
catch(IOException ex) {
System.err.println(ex);
}
}
}
====================================================================
//Client
import java.io.*;
import java.net.*;
import java.util.*;
import java.awt.*;
import java.awt.event.*;
import javax.swing.*;
public class Client extends JFrame implements ActionListener {
private JTextField JexT = new JTextField();
private JTextArea JtaR = new JTextArea();
DataOutputStream osTS;
DataInputStream iFrS;
public static void main(String[] args) {
new Client();
}
public Client() {
JPanel p = new JPanel();
p.setLayout(new BorderLayout());
p.add(new JLabel("Enter Random Number"), BorderLayout.WEST);
p.add(JexT, BorderLayout.CENTER);
JexT.setHorizontalAlignment(JTextField.RIGHT);
getContentPane().setLayout(new BorderLayout());
getContentPane().add(p, BorderLayout.SOUTH);
getContentPane().add(new JScrollPane(JtaR), BorderLayout.CENTER);
JexT.addActionListener(this);
setSize(500,300);
setTitle("Client");
setDefaultCloseOperation(JFrame.EXIT_ON_CLOSE);
setVisible(true);
try {
Socket connectToServer = new Socket("localhost", 7000);
iFrS = new DataInputStream(
connectToServer.getInputStream());
osTS =
new DataOutputStream(connectToServer.getOutputStream());
}
catch (IOException ex) {
JtaR.append(ex.toString() + '\n');
}
}
public void actionPerformed(ActionEvent e) {
String actionCommand = e.getActionCommand();
if (e.getSource() instanceof JTextField) {
try {
double radius = Double.parseDouble(JexT.getText().trim());
osTS.writeDouble(radius);
osTS.flush();
double area = iFrS.readDouble();
JtaR.append("Number is " + radius + "\n");
JtaR.append("Random Number received from the server is "
+ area + '\n');
}
catch (IOException ex) {
System.err.println(ex);
}
}
}
}
===================================================================
.png)


沒有留言:
張貼留言